
Introduction.
Stairs are often an overlooked detail within a custom map, often abused for more obvious detail subjects. For starters it's always good to have consistency within your map. A lack of it can make your map confusing to play through, messy, and amateurish in appearence. Sometimes, however, it can be unavoidable due to available space or lack of themed materials for use; making stairs potentially conflict with your environments theme; a common design issue in custom maps.
Basics.
I am going to summarise 'stairway' construction into 3 basic techniques. Models, Ramps and Stairs.
1. If you are lucky enough to have the correct heights and space available, you may simply use a stair case model, such as: props_forest\wood_stairs*, models/props_farm/stairs_wood* or prop_trainyard\stairs*.
An easy but purely circumstantial resolution. The con from using prefabricated models from other maps, is that players noticing them may be jolted from their immersion as they recognise the model; thinking "hey, this is the stair case from such and such map". So discretion is advised when utilising prefabricated stair models. It is often convinient to have certain stairs of your own converted from brush work to a model, if you have the social connections or ability to do this yourself, it can be a healthy pay off. As a models equivilant cost to memory is significantly lower than that of brush work (another topic altogether, however).
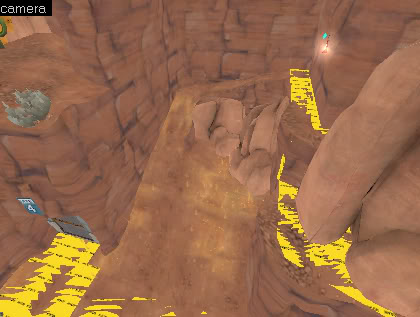
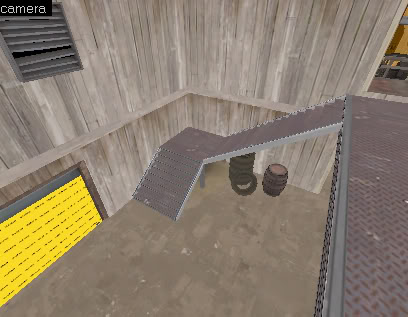
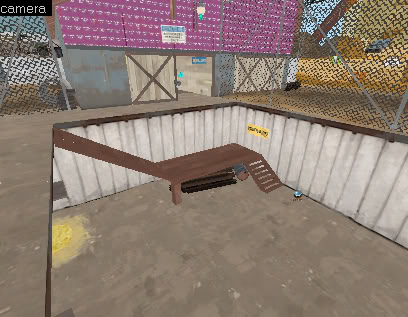
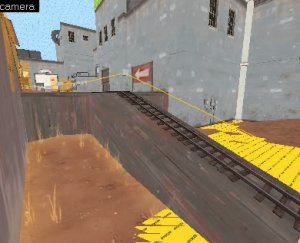
2. Ramps, the easiest and simplest approach to allowing players to climb to higher ground. Ramps have the benefit of allowing any (climbable) angle possible with little worry to grid allignment, atleast beyond texture alligning. So ramps may be employed as a design choice due to awkward space availablility, or just an area design theme that would call for a ramp over steps. They also provide a much cleaner combat surface for splash damage weapons.

'Ramps' may come in 3 different forms:
Your basic brush based ramp.
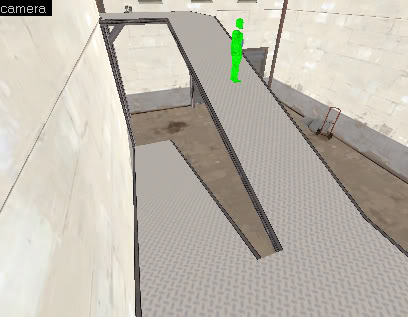
Displacement.
Or model based.

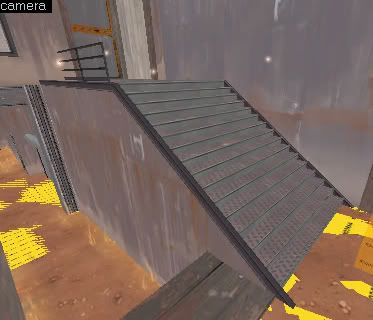
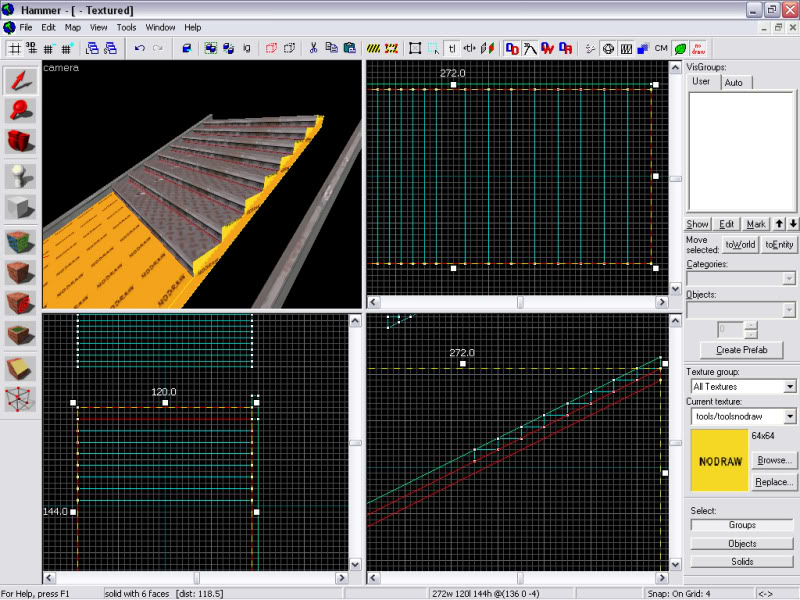
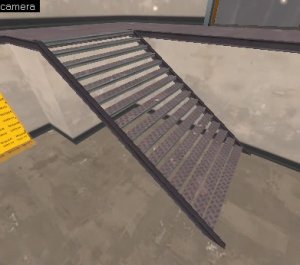
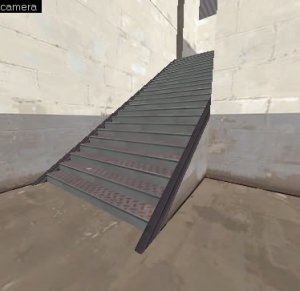
3. Your most common and durable stair case construction method will be your brush based stair case. Which will come in (commonly) 1:1, 1:2 or 2:3 x/y ratio's. Valve mostly utilise 2:3, although 1:2 tends to be a custom mappers preference (probably due to the stricter grid allignment).
Stairs may also come in more custom styles/appearences, but as long as the tallest step remains 16 units high or less, it will not cause players grief to traverse (which is good).
Construction techniques.
The beginner mapper may be slightly at odds with how to start constructing his stairs. Which is often why you will find a lack of continuity to stairs within beginner made maps. Each stair case ends up unique as he/she explores the possibilites and often forgets or fears to revise older stair structures within the same map. Here are some guidelines to producing more consistant and professional looking stairs within your maps. Summarised again into 3 common construction styles:
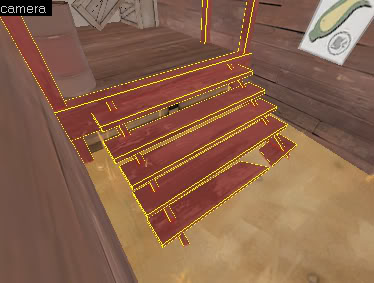
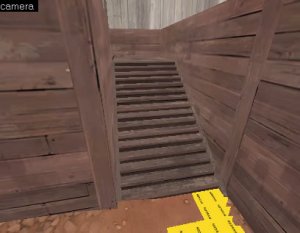
'Solid' stairs.
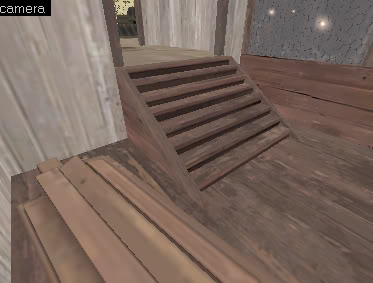
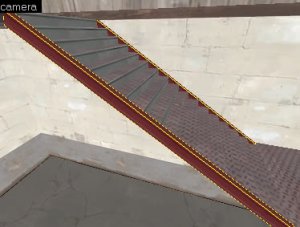
A lot of stairs will run over solid geometry, basically consisting of steps sitting ontop of what would otherwise be a ramp. If the stairs are flanked either side by walls there will be no obligation to trim your steps. But it is always nice to trim your steps anyway. Valve commonly rim their wooden steps, utilising a 2 unit wide trim boardering the wall (think-skirting board), usually using wood/wood_beam* or wood/grain_elevator_facade* textures, and occasionally skip trimming their metal or concrete steps given the circumstance. If they have however, the trim will likely be 4, 8 or 16 units wide.
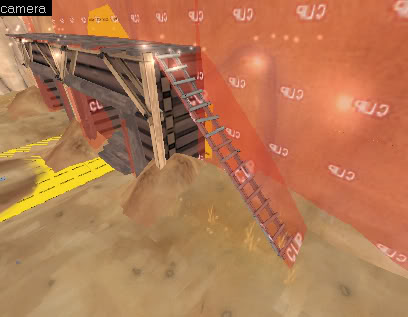
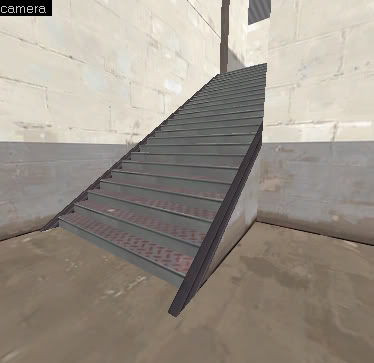
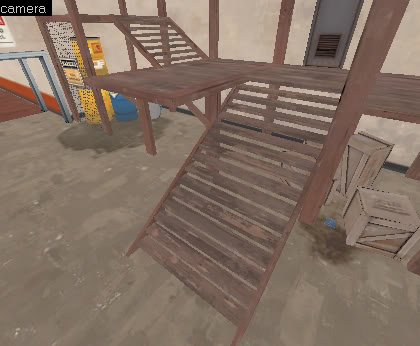
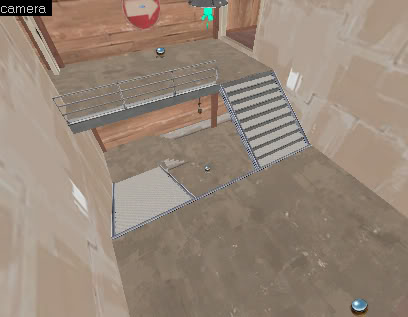
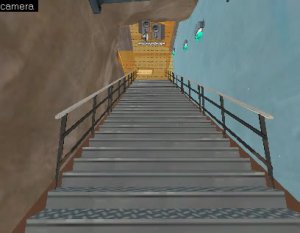
'Hanging' stairs.


Stairs with an open space underneath. Allowing for player usable space, or space for other map details. Irrespective of the climb ratio, these stairs will usually end up providing some sort of strong cover, which in turn provides a more dynamic experience for players. Combining stair mechanics with obstacle/cover mechanics.
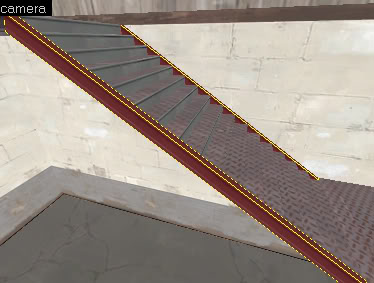
It is sensible to provide a solid back to 'hanging' steps. It works out this way in general when using the optimum step sizes and allows you to have appropriately sized stair frames. this gives the impression of strength to hold the player, but also prevents possible pixel sized visual leaks if you apply a gray texture underneath, where the area behind might show through (which occasionally happens for people who don't run anti-aliasing). Trims for 'step' stair cases tend to be wider, allowing players to more easily believe the structure they are being supported on is strong enough to actually support them. 4, 8 and 16 units wide are safe unit sizes for your trims regarding a 'hanging' stair case. When utilising metal textures, Valve have used 2 or 4 units wide trims at times (lumberyard). Steps will also conform to 8, 12 or 16 units in height.
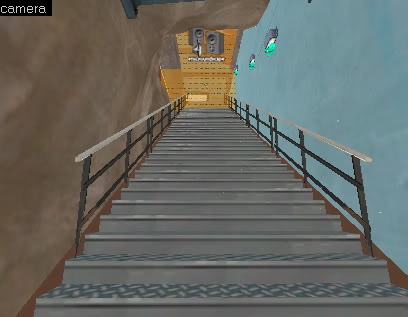
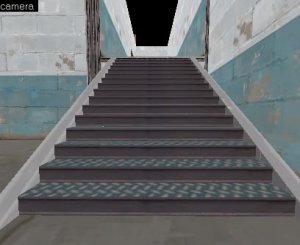
'Hanging step' stairs.

A similar principle to the previous, but with gaps between each step that allow the player to see through to behind the stairs. These provide less cover for players, limiting their dynamic effect on gameplay, as they prevent ambushes due to increased visibility through them, and are (with great difficulty mind) able to be shot through. They do provide limited cover, blocking most bullets/projectiles, and are a favourite hiding spot for cloak and dagger spies; due to the visibility factor. These stairs are also good for detail oppotunities as they allow the player to see into a possibly out of bounds/unplayable area. In the case of 'hanging step' staircases, trims are an absolute necessity to make them look functionally believable.
Stairs and your map.
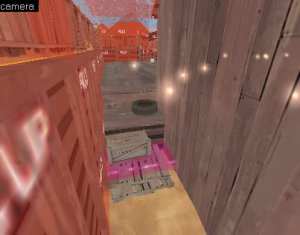
One of the most common habits for beginner mappers is to create long stairs. These are boring to look at, boring to traverse and often count as 'anti-cover' for players whilst being climbed. A useful technique is to wrap a staircase into/around a corner, this will often provide a more dynamic experience for the player as well as improving aesthetic appearences.
Along the same lines, one may utilise a "step" technique. A 'pad' in the middle of the height of the stair case provides a platform that makes the stairs more interesting to look at and provide an oppotunity for the mapper to leave items or engineers to build here. These 'pads' are often used these days (irl), for ease of use for the less physically capable, such as old or disabled individuals, allowing them to comfortably stop and gain their breath/strength whilst climbing tall stair cases (although these are hardly circumstances enacted within TF2, they are grounds for justification).
Taking this a step further, one creates spiral stair cases. Often associated with flats and American ghetto fire escapes, these constructions allow for a gain in height with little to no hinderance to space (provided an appropriate x:y ratio is applied). These can how ever become clumsy to traverse if not given enough space.
Rubble.

Rubble is what i call detail items that neither constitute a ramp or stair case and will often require jumping to traverse. Leading to a tendancy to break game flow, players will not like to climb 'rubble' as (like long winded staircases) it behaves as 'anti-cover'. Leaving them vulnerable and often horizontally static for brief periods of time whilst they jump up and over. 'Rubble' significantly over powers any high ground defence, particularly sentries, demo's and heavies, as it reduces the pace of an assault. Rubble can provide an interesting/unique game mechanic within a map, but more often than not lead to frustrating the standard player, leaving them to ignore that route altogether. But balancing it as a short cut can be a good method of justifying such a scenario, whether players hate it or not.
After Construction.
As a finishing touch, it is a wise practice to player clip a ramp over your staircase to stop the ingame bobbing effect players experience whilst climbing steps.
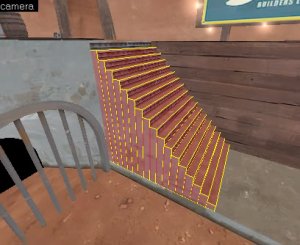
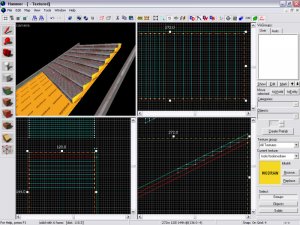
One of, if not the worst abuse of attention to detail regarding stairs is copy and paste. It shows through your textures if you are not careful, and the larger/longer your stair case, the more noticable it will be. Especially in more detailed textures, where certain patterns will repeat over and over in each step. This can be avoided by manually displacing your texture horizontally every 20 units, via the texture tool window. So you might have one step at 0 horizontal displacement, another at 100, the next at 80, the next at -200, the next at 120, etc. The amount you can displace your texture to break up 'repeatative texture syndrome' is dependant on the texture size, which can often not be that much at all when dealing with textures specifically created to be steps or trims. But vigilance will prevail, even if you just copy and paste 4-6 steps at a time with differing texture displacements.
Bad:

Good:

Useful metal stair materials:
metal/metaltrack001
metal/ibeam*
metal/floorplate01
metal/metaldoor001
metal/metalstair*
props/metaldoor01_192
Useful wooden stair materials:
wood/grain_elevator_facade*
wood/wood_beam03
wood/wood_bridge001
wood/wood_wall006
wood/wood_wall020*
Summary of information:
Valve utilise a stair climb ratio of 2:3.
Maximum step height is 16 units tall. 8, 12 or 16 are common heights. Do not be afraid of such small grid sizes!!!!
2, 4 and 8 are the most common Valve trim width. 16 is also acceptable.
Long stairs play awfully, and look as aweful as they play.
A healthy stair width allows for 2 players to pass without clipping. 128 units is healthy (Badwater reference). Less dictates a choke point. (such as <88 units).
Ramps are as acceptable as stairs, but stairs look nicer.
Player clip your stairs to prevent screen bouncing.
Stairs are often an overlooked detail within a custom map, often abused for more obvious detail subjects. For starters it's always good to have consistency within your map. A lack of it can make your map confusing to play through, messy, and amateurish in appearence. Sometimes, however, it can be unavoidable due to available space or lack of themed materials for use; making stairs potentially conflict with your environments theme; a common design issue in custom maps.
Basics.
I am going to summarise 'stairway' construction into 3 basic techniques. Models, Ramps and Stairs.
1. If you are lucky enough to have the correct heights and space available, you may simply use a stair case model, such as: props_forest\wood_stairs*, models/props_farm/stairs_wood* or prop_trainyard\stairs*.
An easy but purely circumstantial resolution. The con from using prefabricated models from other maps, is that players noticing them may be jolted from their immersion as they recognise the model; thinking "hey, this is the stair case from such and such map". So discretion is advised when utilising prefabricated stair models. It is often convinient to have certain stairs of your own converted from brush work to a model, if you have the social connections or ability to do this yourself, it can be a healthy pay off. As a models equivilant cost to memory is significantly lower than that of brush work (another topic altogether, however).
2. Ramps, the easiest and simplest approach to allowing players to climb to higher ground. Ramps have the benefit of allowing any (climbable) angle possible with little worry to grid allignment, atleast beyond texture alligning. So ramps may be employed as a design choice due to awkward space availablility, or just an area design theme that would call for a ramp over steps. They also provide a much cleaner combat surface for splash damage weapons.
'Ramps' may come in 3 different forms:
Your basic brush based ramp.
Displacement.
Or model based.
3. Your most common and durable stair case construction method will be your brush based stair case. Which will come in (commonly) 1:1, 1:2 or 2:3 x/y ratio's. Valve mostly utilise 2:3, although 1:2 tends to be a custom mappers preference (probably due to the stricter grid allignment).
Stairs may also come in more custom styles/appearences, but as long as the tallest step remains 16 units high or less, it will not cause players grief to traverse (which is good).
Construction techniques.
The beginner mapper may be slightly at odds with how to start constructing his stairs. Which is often why you will find a lack of continuity to stairs within beginner made maps. Each stair case ends up unique as he/she explores the possibilites and often forgets or fears to revise older stair structures within the same map. Here are some guidelines to producing more consistant and professional looking stairs within your maps. Summarised again into 3 common construction styles:
'Solid' stairs.
A lot of stairs will run over solid geometry, basically consisting of steps sitting ontop of what would otherwise be a ramp. If the stairs are flanked either side by walls there will be no obligation to trim your steps. But it is always nice to trim your steps anyway. Valve commonly rim their wooden steps, utilising a 2 unit wide trim boardering the wall (think-skirting board), usually using wood/wood_beam* or wood/grain_elevator_facade* textures, and occasionally skip trimming their metal or concrete steps given the circumstance. If they have however, the trim will likely be 4, 8 or 16 units wide.
'Hanging' stairs.
Stairs with an open space underneath. Allowing for player usable space, or space for other map details. Irrespective of the climb ratio, these stairs will usually end up providing some sort of strong cover, which in turn provides a more dynamic experience for players. Combining stair mechanics with obstacle/cover mechanics.
It is sensible to provide a solid back to 'hanging' steps. It works out this way in general when using the optimum step sizes and allows you to have appropriately sized stair frames. this gives the impression of strength to hold the player, but also prevents possible pixel sized visual leaks if you apply a gray texture underneath, where the area behind might show through (which occasionally happens for people who don't run anti-aliasing). Trims for 'step' stair cases tend to be wider, allowing players to more easily believe the structure they are being supported on is strong enough to actually support them. 4, 8 and 16 units wide are safe unit sizes for your trims regarding a 'hanging' stair case. When utilising metal textures, Valve have used 2 or 4 units wide trims at times (lumberyard). Steps will also conform to 8, 12 or 16 units in height.
'Hanging step' stairs.
A similar principle to the previous, but with gaps between each step that allow the player to see through to behind the stairs. These provide less cover for players, limiting their dynamic effect on gameplay, as they prevent ambushes due to increased visibility through them, and are (with great difficulty mind) able to be shot through. They do provide limited cover, blocking most bullets/projectiles, and are a favourite hiding spot for cloak and dagger spies; due to the visibility factor. These stairs are also good for detail oppotunities as they allow the player to see into a possibly out of bounds/unplayable area. In the case of 'hanging step' staircases, trims are an absolute necessity to make them look functionally believable.
Stairs and your map.
One of the most common habits for beginner mappers is to create long stairs. These are boring to look at, boring to traverse and often count as 'anti-cover' for players whilst being climbed. A useful technique is to wrap a staircase into/around a corner, this will often provide a more dynamic experience for the player as well as improving aesthetic appearences.
Along the same lines, one may utilise a "step" technique. A 'pad' in the middle of the height of the stair case provides a platform that makes the stairs more interesting to look at and provide an oppotunity for the mapper to leave items or engineers to build here. These 'pads' are often used these days (irl), for ease of use for the less physically capable, such as old or disabled individuals, allowing them to comfortably stop and gain their breath/strength whilst climbing tall stair cases (although these are hardly circumstances enacted within TF2, they are grounds for justification).
Taking this a step further, one creates spiral stair cases. Often associated with flats and American ghetto fire escapes, these constructions allow for a gain in height with little to no hinderance to space (provided an appropriate x:y ratio is applied). These can how ever become clumsy to traverse if not given enough space.
Rubble.
Rubble is what i call detail items that neither constitute a ramp or stair case and will often require jumping to traverse. Leading to a tendancy to break game flow, players will not like to climb 'rubble' as (like long winded staircases) it behaves as 'anti-cover'. Leaving them vulnerable and often horizontally static for brief periods of time whilst they jump up and over. 'Rubble' significantly over powers any high ground defence, particularly sentries, demo's and heavies, as it reduces the pace of an assault. Rubble can provide an interesting/unique game mechanic within a map, but more often than not lead to frustrating the standard player, leaving them to ignore that route altogether. But balancing it as a short cut can be a good method of justifying such a scenario, whether players hate it or not.
After Construction.
As a finishing touch, it is a wise practice to player clip a ramp over your staircase to stop the ingame bobbing effect players experience whilst climbing steps.
One of, if not the worst abuse of attention to detail regarding stairs is copy and paste. It shows through your textures if you are not careful, and the larger/longer your stair case, the more noticable it will be. Especially in more detailed textures, where certain patterns will repeat over and over in each step. This can be avoided by manually displacing your texture horizontally every 20 units, via the texture tool window. So you might have one step at 0 horizontal displacement, another at 100, the next at 80, the next at -200, the next at 120, etc. The amount you can displace your texture to break up 'repeatative texture syndrome' is dependant on the texture size, which can often not be that much at all when dealing with textures specifically created to be steps or trims. But vigilance will prevail, even if you just copy and paste 4-6 steps at a time with differing texture displacements.
Bad:
Good:
Useful metal stair materials:
metal/metaltrack001
metal/ibeam*
metal/floorplate01
metal/metaldoor001
metal/metalstair*
props/metaldoor01_192
Useful wooden stair materials:
wood/grain_elevator_facade*
wood/wood_beam03
wood/wood_bridge001
wood/wood_wall006
wood/wood_wall020*
Summary of information:
Valve utilise a stair climb ratio of 2:3.
Maximum step height is 16 units tall. 8, 12 or 16 are common heights. Do not be afraid of such small grid sizes!!!!
2, 4 and 8 are the most common Valve trim width. 16 is also acceptable.
Long stairs play awfully, and look as aweful as they play.
A healthy stair width allows for 2 players to pass without clipping. 128 units is healthy (Badwater reference). Less dictates a choke point. (such as <88 units).
Ramps are as acceptable as stairs, but stairs look nicer.
Player clip your stairs to prevent screen bouncing.
Attachments
-
 1-1.jpg34 KB · Views: 482
 -
 boarder.jpg20.8 KB · Views: 2,627
 -
 copy-paste3.jpg22.3 KB · Views: 2,652
 -
 copy-paste1.jpg23 KB · Views: 2,834
 -
 prop_2.jpg22.8 KB · Views: 2,646
 -
 spiral2.jpg21.2 KB · Views: 2,584
 -
 corner.jpg38.1 KB · Views: 2,751
 -
 corner2.jpg29.3 KB · Views: 2,858
 -
 longstairs.jpg38.6 KB · Views: 2,680
 -
 step-stair2.jpg29.8 KB · Views: 2,713
 -
 step-stair1.jpg25.6 KB · Views: 2,746
 -
 stair1.jpg145.4 KB · Views: 2,806
 -
 step-stair4.jpg36.8 KB · Views: 2,813
 -
 step-stair3.jpg30.4 KB · Views: 2,869
 -
 solid-stair5.jpg23.2 KB · Views: 3,099
 -
 solid-stair2.jpg19 KB · Views: 3,119
 -
 solid-stair6.jpg19.2 KB · Views: 2,906
 -
 solid-stair3.jpg23.1 KB · Views: 2,901
 -
 custom1.jpg26.8 KB · Views: 2,870
 -
 prop_1.jpg23.9 KB · Views: 2,949
 -
 rampprop2.jpg46.2 KB · Views: 2,882
 -
 disp-hill2.jpg26.5 KB · Views: 2,901
 -
 ramp3.jpg24.9 KB · Views: 3,002
 -
 ramp2.jpg29.2 KB · Views: 2,786
Last edited:


